Splitting a keyboard in half
More buttons per button
I’ve recently transitioned to daily driving a split mechanical keyboard or ‘ErgoMech’ as it is sometimes called. Research on ergonomic keyboards has been around since the typewriter with the first study on splitting keyboards into two clusters being Rationalisierung der Schreibmaschine und ihrer Bedienung (Rationalization of the typewriter and its operation) back in 1926. With that said over my last decade as software engineer I could probably count the people using an ergonomic setup on one hand and almost all of them were only using a vertical mouse.
This has recently changed at least in my corner of the world and social media. The ErgoMechKeyboards subreddit is currently sitting at 65k subscribers and influencers like The Primeagen who happily talks about the importance of an ergonomic setup are driving more people to check this out. As we spend more time on our computers and become more aware of the potentially lifelong problems such as carpal tunnel or RSI ergonomics become more and more relevant.
There has also been an increase in availability of vendors selling these keyboards. It used to be relegated to a few very expensive choices or you had to bust out the soldering iron. As mechanical keyboards have been established in the mainstream their split counterparts are the perfect outlet for more exotic setups.
Motivation
Alright so what is the point? Well if the intro wasn’t obvious enough ergonomics is at the heart of the issue for me. I had recently felt that my posture was getting really cramped with my shoulders slumping inwards towards my chest. This ended up exacerbating problems with a sternum inflammation that I sustained from overtraining at one point. I realized this coincided with me switching to a smaller keyboard that forced my hands closer together as I was typing.
I also started programming more C++ and Rust over the last year and found myself increasingly frustrated by the symbol placement when using a standard Swedish QWERTY layout. If you look at the image below you can see that many common symbols ({}, [], / etc) require you to contort your hand in an awkward manner and it gets old, really fast.
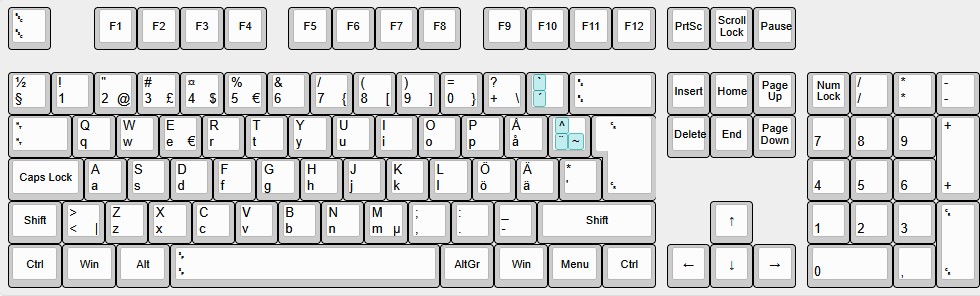 Pictured: Very annoying symbols
Finding a new keyboard
Alright so we are motivated, what is the next step? I actually started with just switching to US layout when programming. This helped somewhat with the issue with symbols as the US layout has significantly better placement of the problematic symbols in question. But the issue remained with my posture so I started looking for alternatives.
Now it turns out there is a plethora of alternatives out there but I quickly realized that they are prohibitively expensive starting with ZSA at $365, the Glove80 at $410 and the Kinesis Advantage360 at an eye watering $499! All of this without tariffs, VAT, customs fees etc added in as all of these companies are based outside the EU. These vendor options are also fairly large making them hard to transport together with my laptop and taking up a lot of space on my desk.
As often is the case, open source comes to the rescue. There is burgeoning open source community dedicated to the creation of split keyboards. As you can see by the link above, there are a lot of options to choose from. So where do you start with so many options out there? There are so many variables and with the steep buy in at least I felt I need to get it very close to right on the first go. I tried listing some of the questions I went through to get to my choice.
- Split or unibody?
- Wired or wireless?
- Column stagger, row stagger or ortholinear?
- How aggressive stagger?
- A number row?
- How many “extra” buttons?
- A LCD screen?
- Rotary encoders?
- Choc or MX switches?
- RGB?
- DYI or pre-built?
Once you have the answers to these questions you should be able to narrow it down to something that fits your preferences and price range. My choice was driven by two primary concerns. Those were minimizing hand movement and price. I was worried about this not working out and having to abandon something I dumped a ton of money into so I tried to minimize costs while still getting the ergonomic benefits I was chasing.
With all of this in mind my next step was this website that lets you compare different keyboard layouts. I have fairly small hands so I wanted to avoid big boards and thumb clusters that were spaced far away. I eventually settled on the Corne with its light column stagger, small footprint and closely spaced thumb cluster.
Corne (Crkbd)
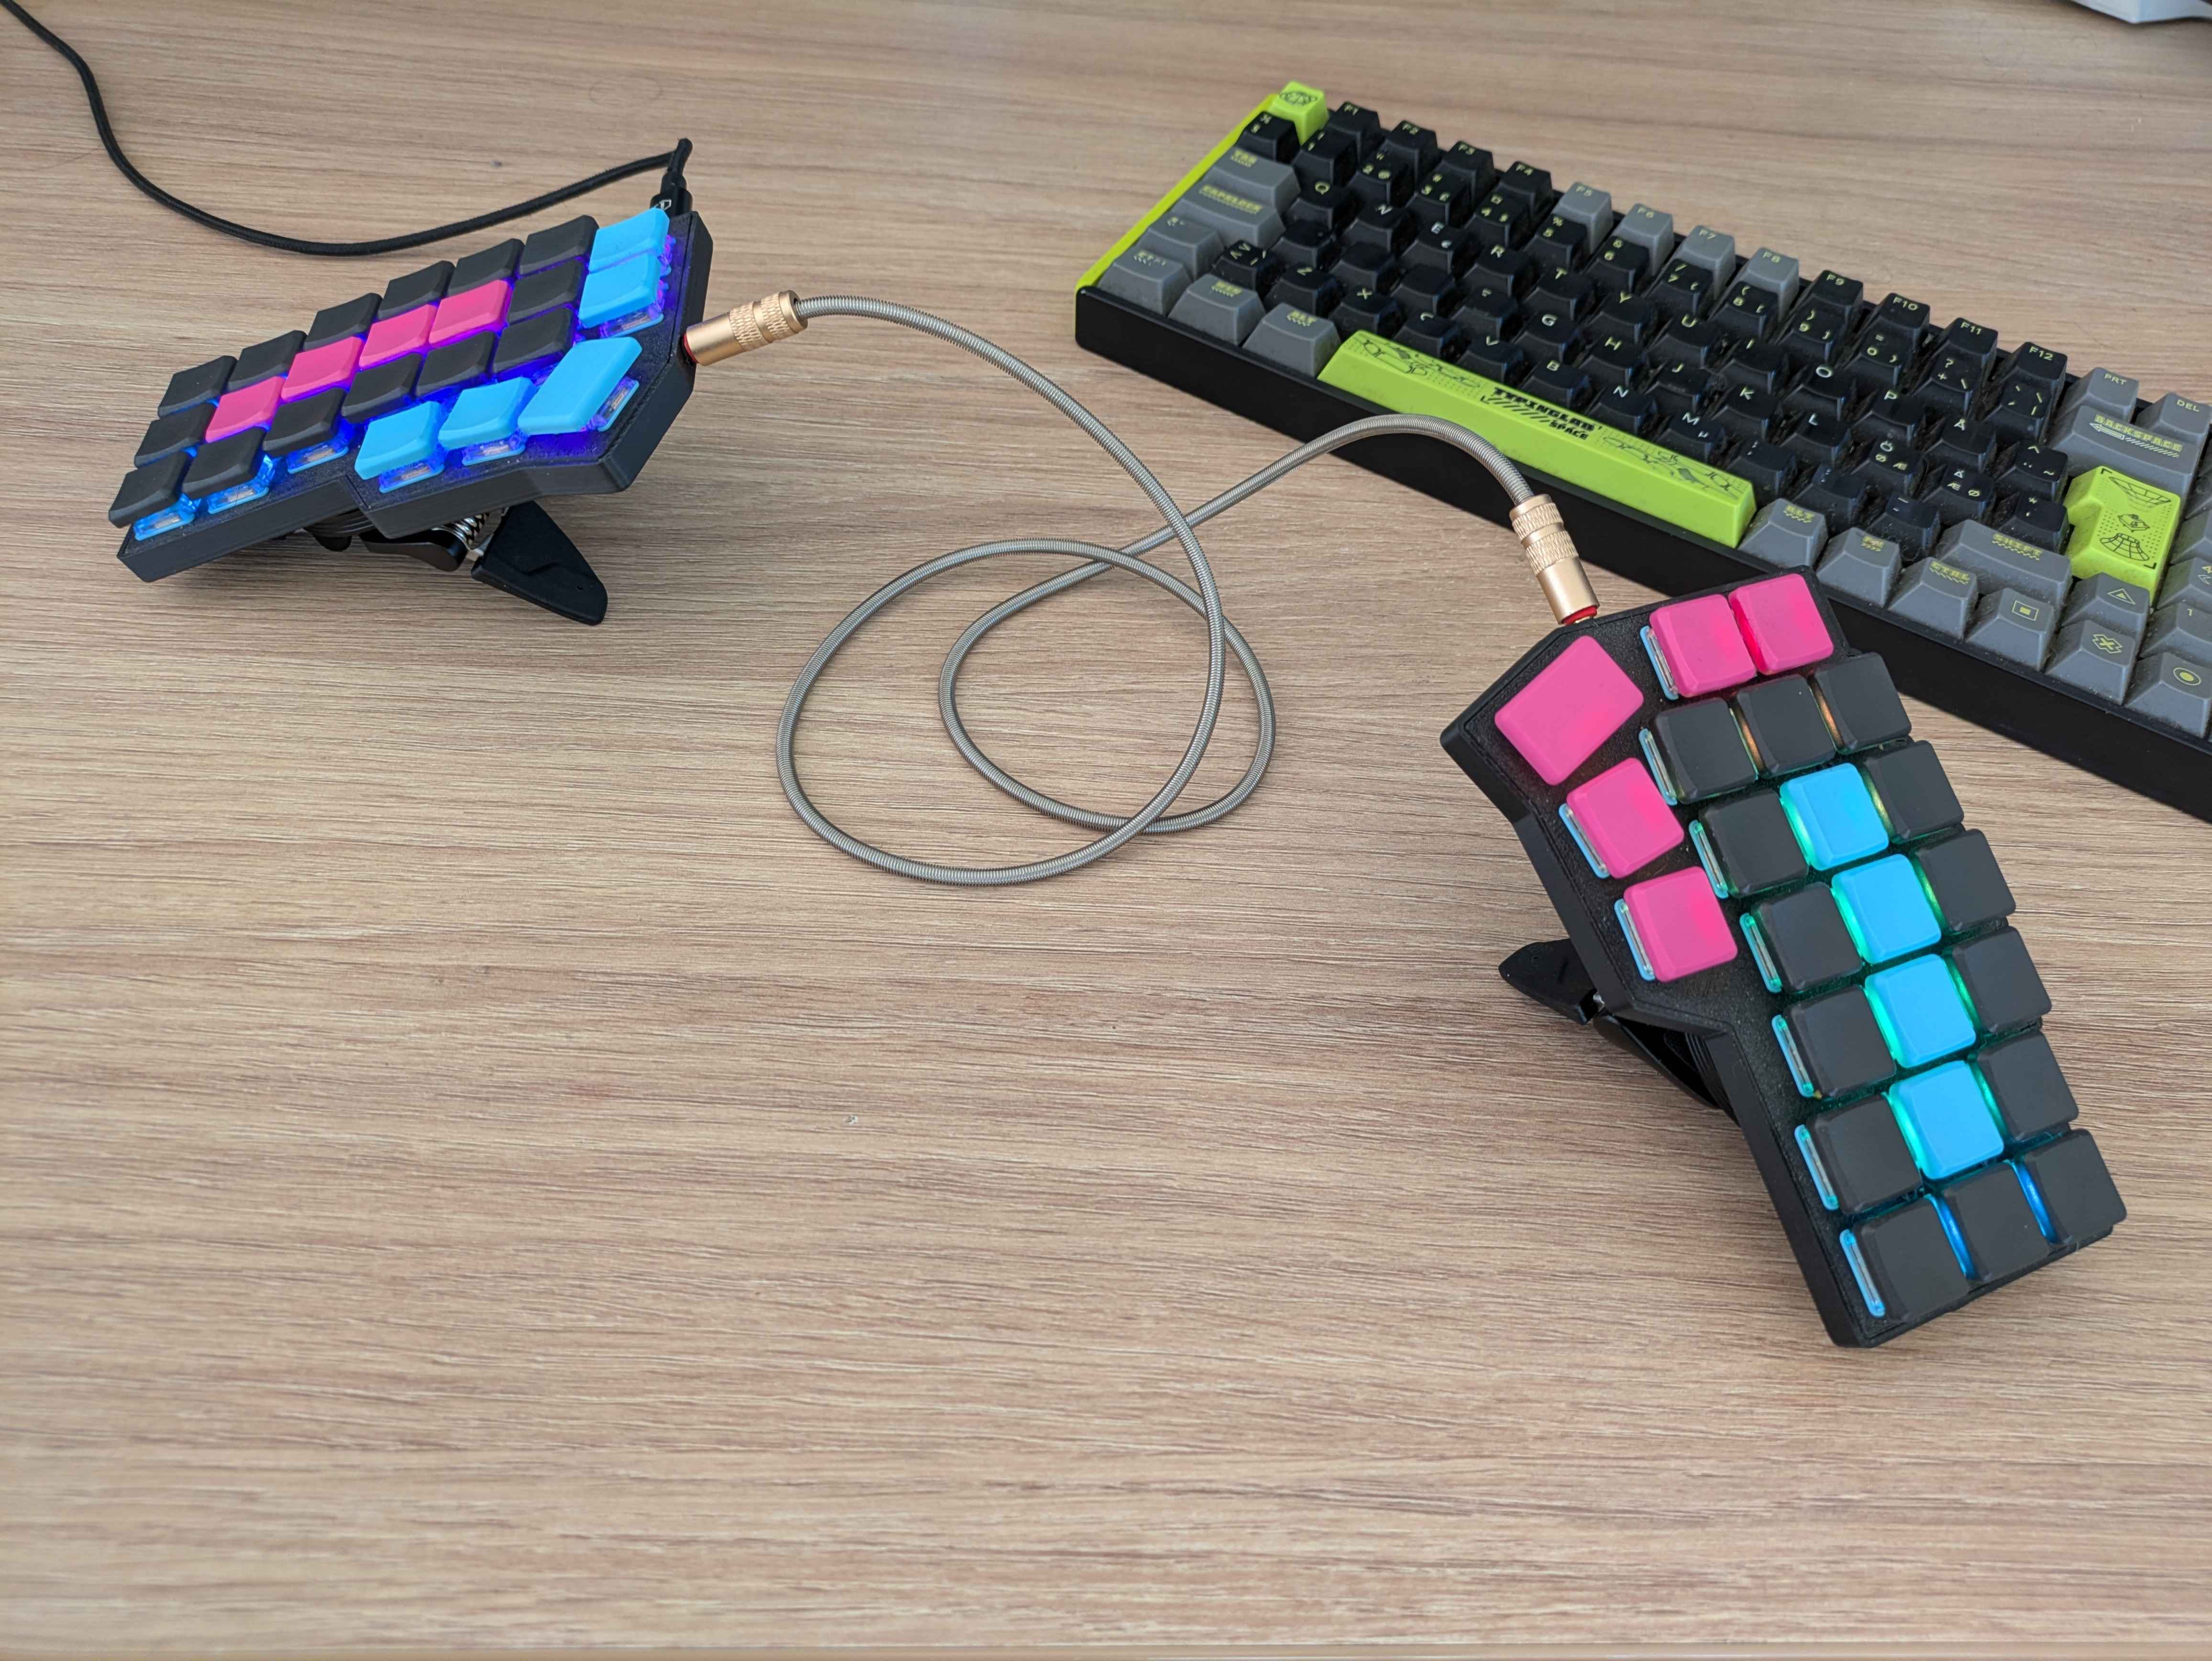
 The grand reveal
I ended up picking up a wired Choc Corne v4.1. The switches I picked are Choc Robin switches, clicky with a fairly heavy actuation at 60gf. I got a pre-soldered board from Etsy as I don’t have the time or equipment to solder my own board. It has a simple3D printed PLA case, RGB and RP2040 controllers.
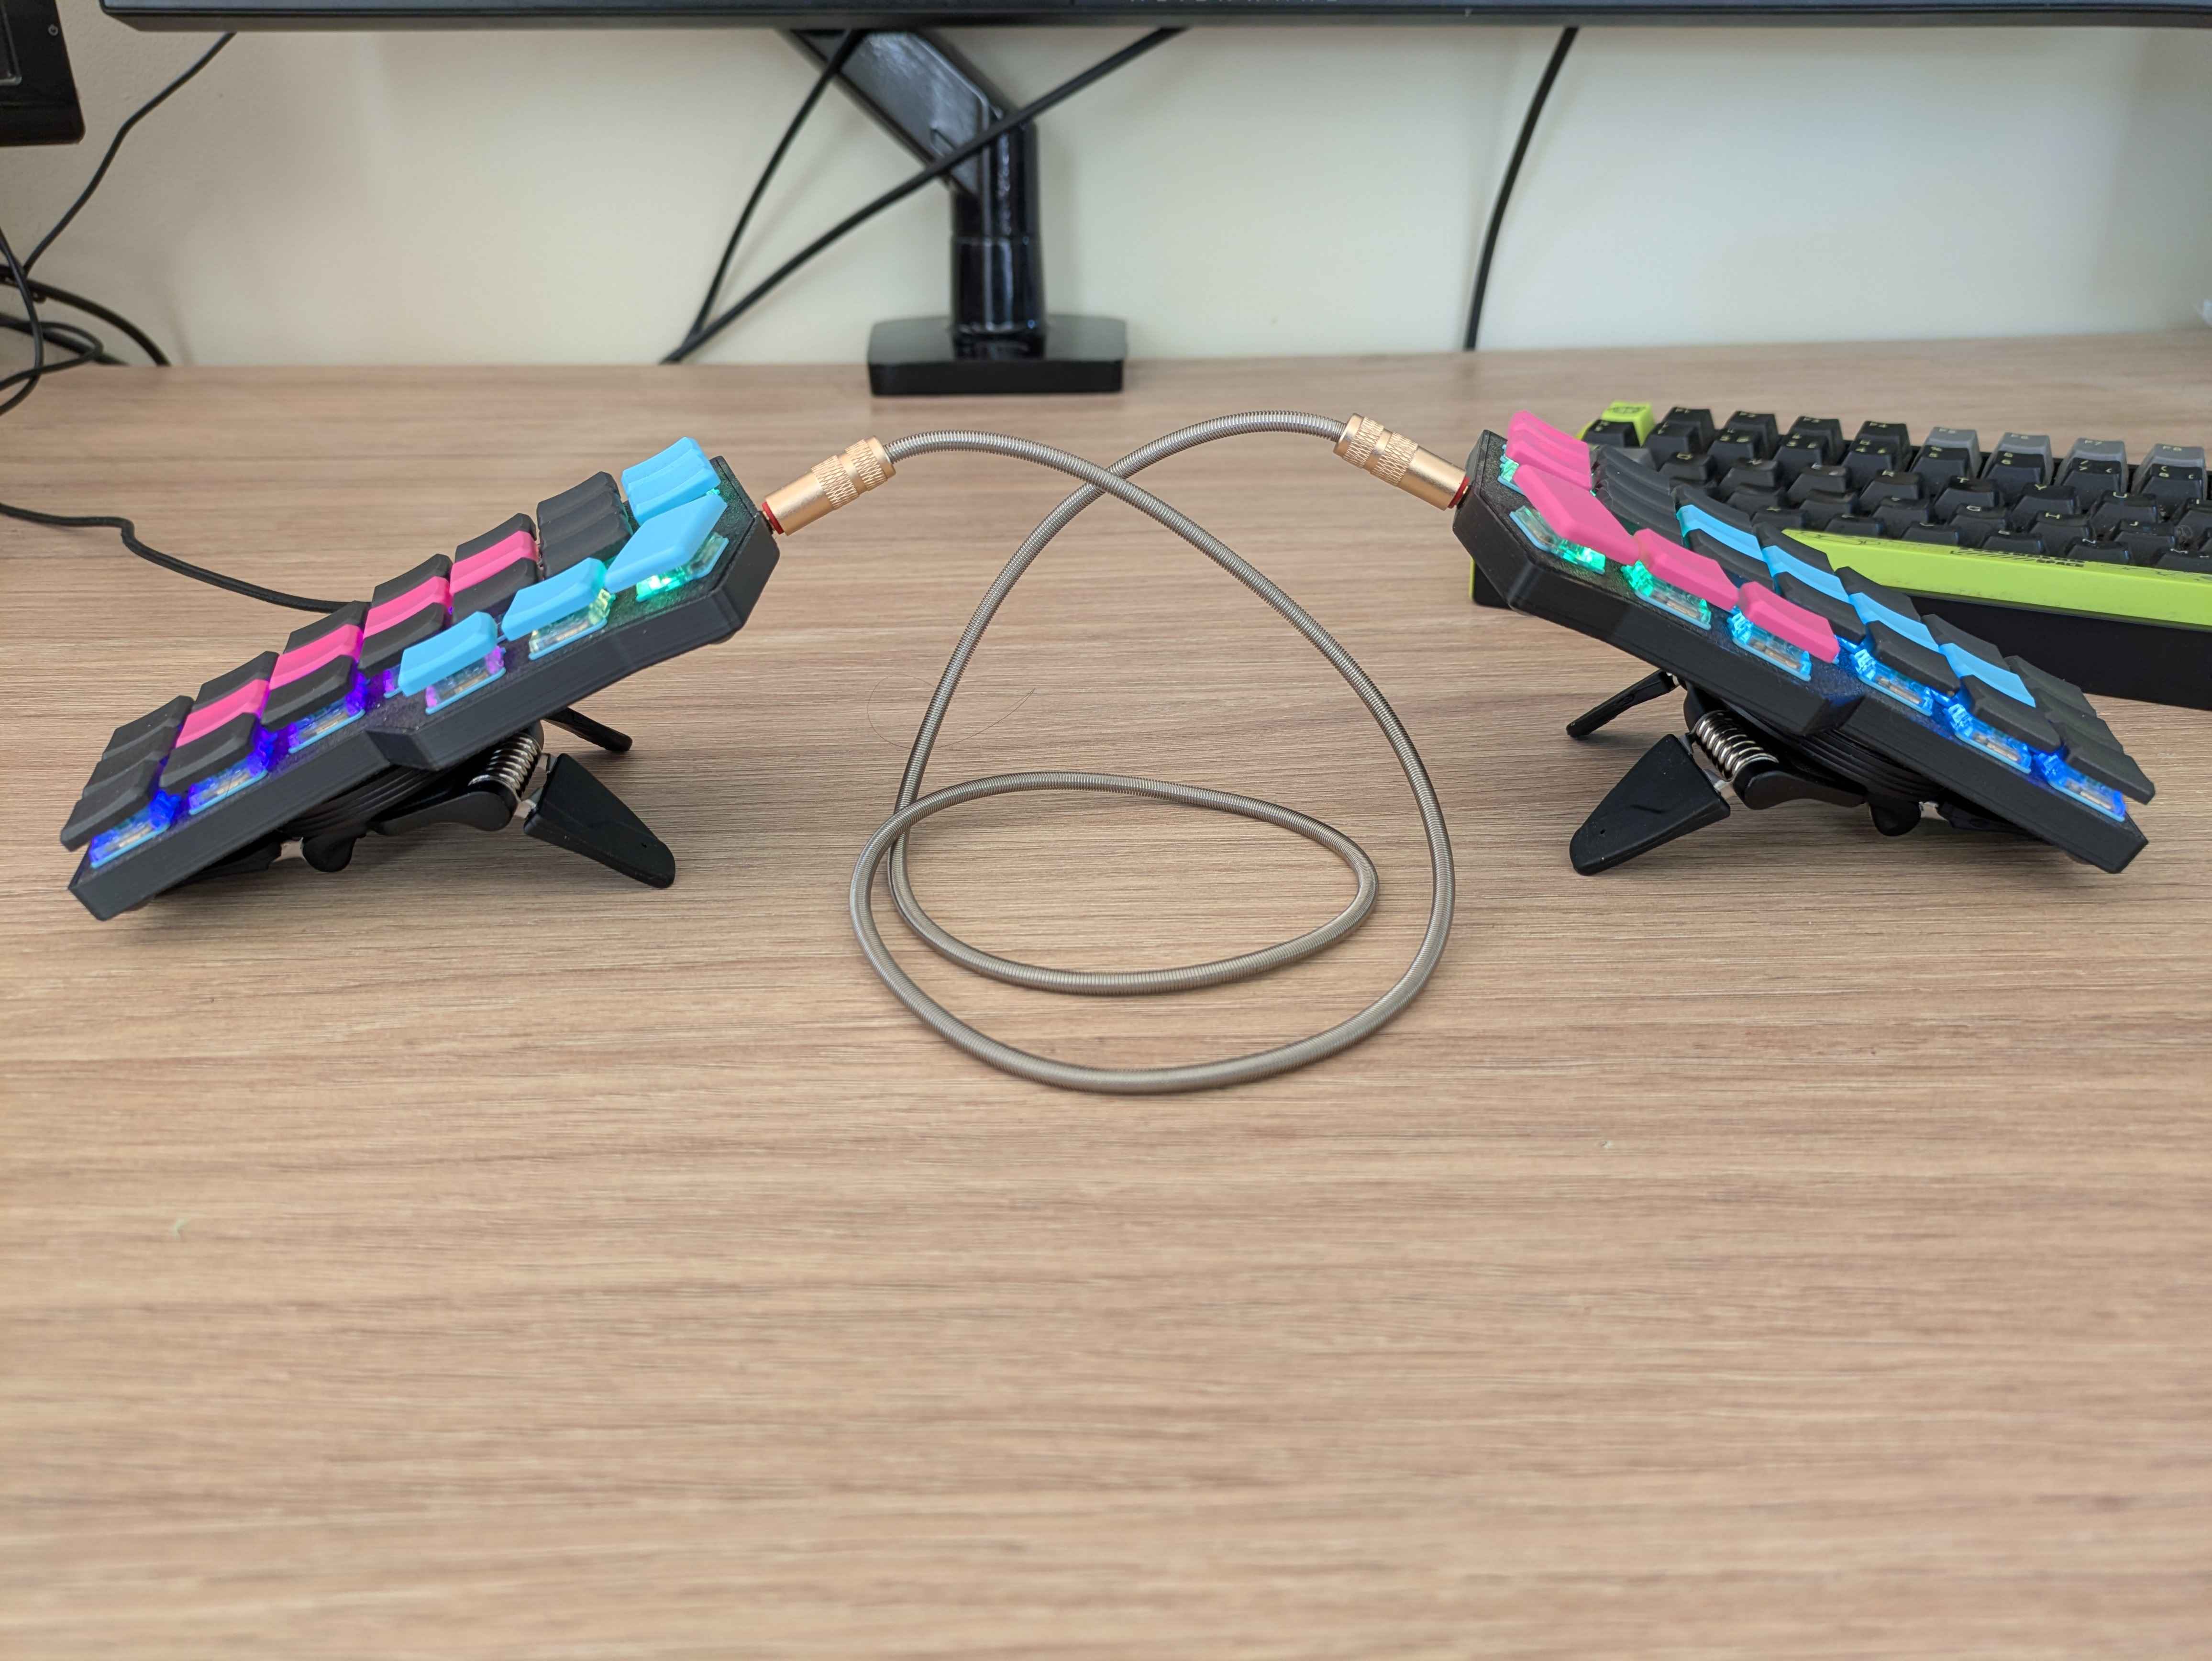
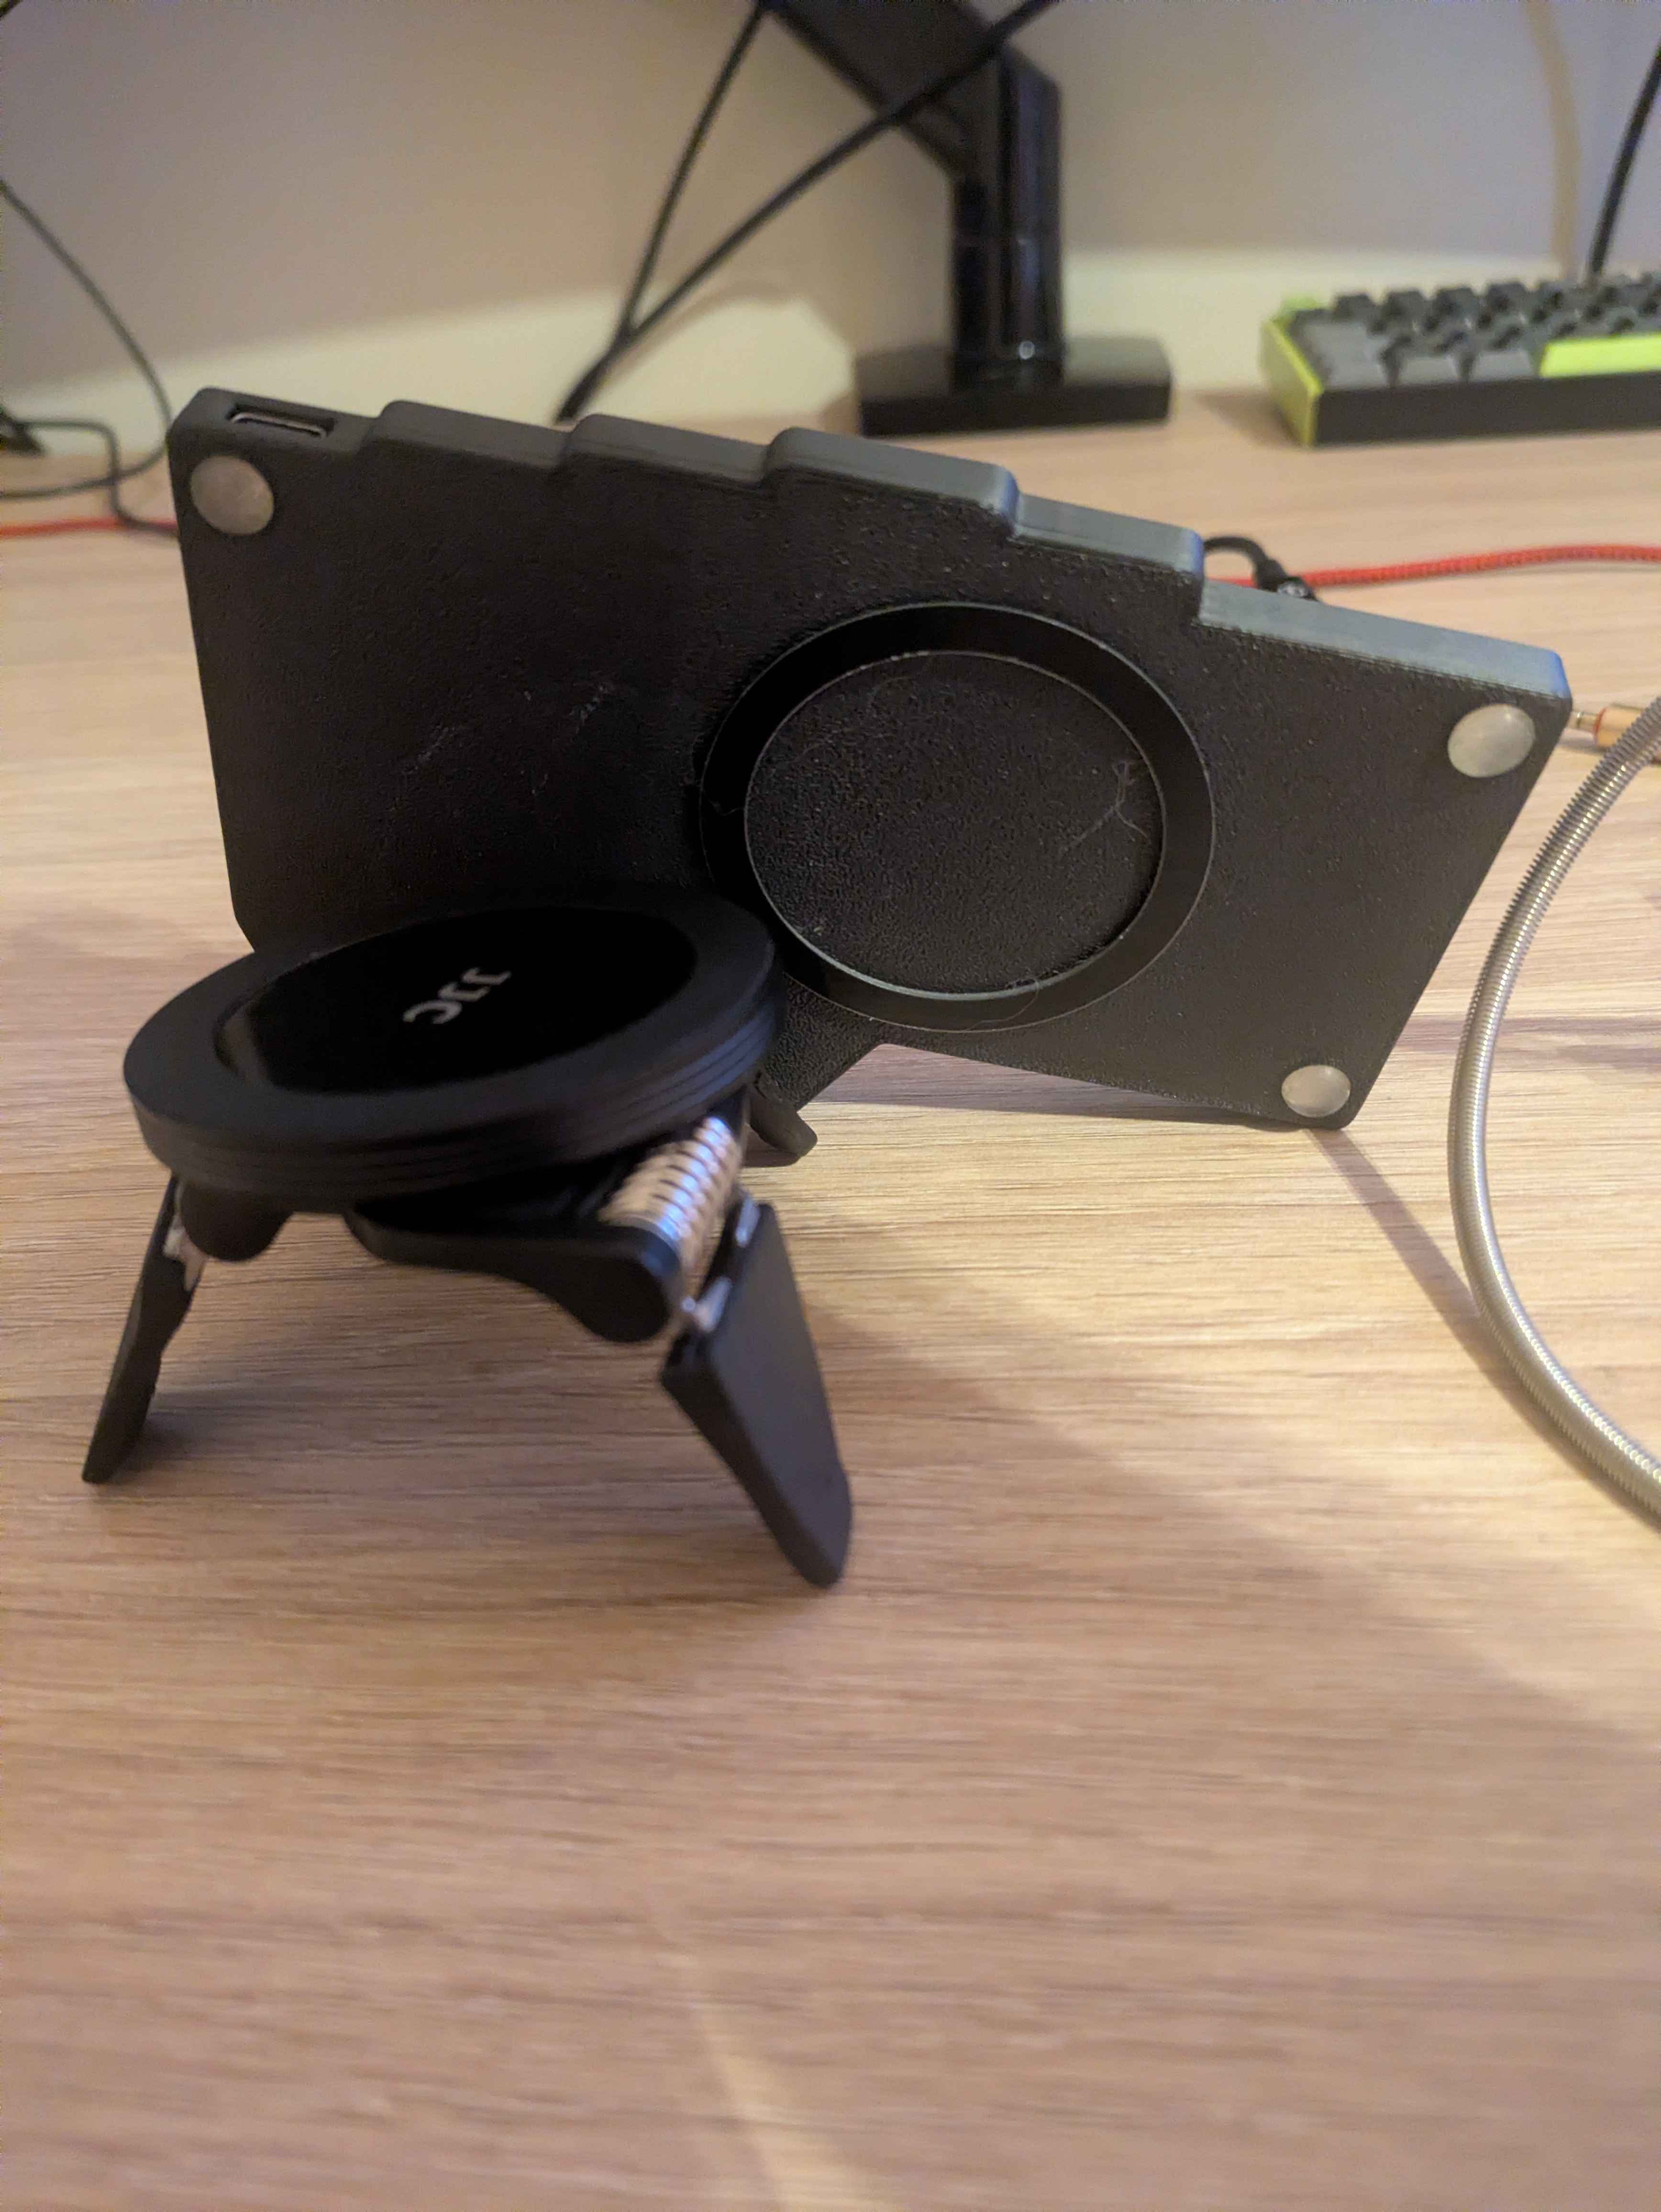 Tenting setup
The tenting setup uses a Manfrotto camera stand and a generic phone magnet setup to mount the board to the stand. Tenting is a whole separate chapter that opens up when you get a split keyboard but Dygma Lab has a good video on the subject.
I will talk more about what I feel about the board itself further at the end of this blog entry.
The Setup
Buying a board is really just the first step to adopting the future™. Your next step, at least if you picked a board within the range of 36-58 keys, is to setup your keyboard layout. There are, again, tons of options here but my starting point was using Vial which is a fork of QMK, an open source keyboard firmware.
The Layout
I knew that since I went with a lower amount of keys (46) I would need to use a lot of layers, which meant re-learning how to use a keyboard from scratch essentially. Layers in this case means that I switch out my keymap to different symbols depending on what keys are being held. So I started looking for keymaps focused on productivity to use as a starting point for my own configuration.
When looking for keymaps you will quickly find the very popular Miryoku layout.
 That’s a lot of buttons per button
Miryoku has 9 layers. That’s a lot. It also doesn’t solve my main problem, configuring the symbol layer to easily reach frequently used symbols in C++, Rust and Python. But it was a great starting point I could use to design my own setup.
Switching from QWERTY
If I was ever going to do this now was the time. QWERTY stems from the 19th century and many alternatives have been presented since then. Looking at Miryoku we can see that it uses Colemak Mod-DH as its base layer. Trying to find reseach on what the best layout for programming and other productivity tasks is turned out way harder than I would have expected. Instead I had to rely on the experiences shared online. The final choice ended up being between Workman and Colemak which are both significantly more modern than Dvorak, another popular choice. I ended up choosing Colemak in the end as it seemed better supported and more popular.
Keymap
Using Colemak-DH as my starting point I created a keymap heavily inspired by Miryoku with some tweaks to suit me better.
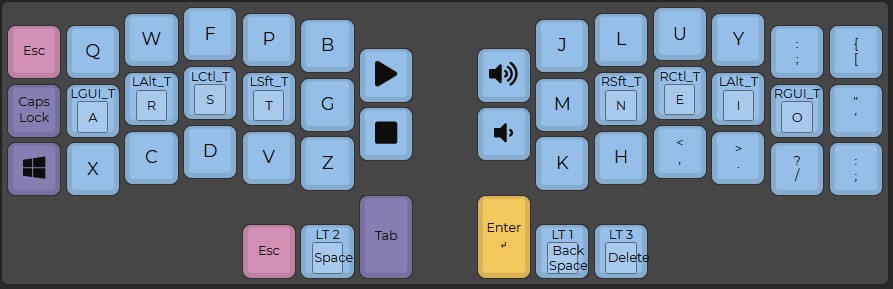 Base layer
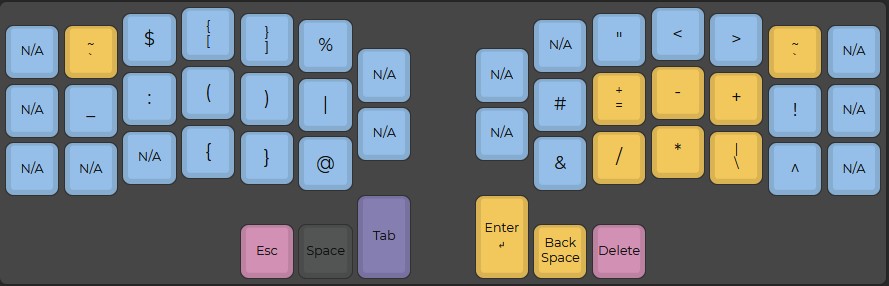 Layer one
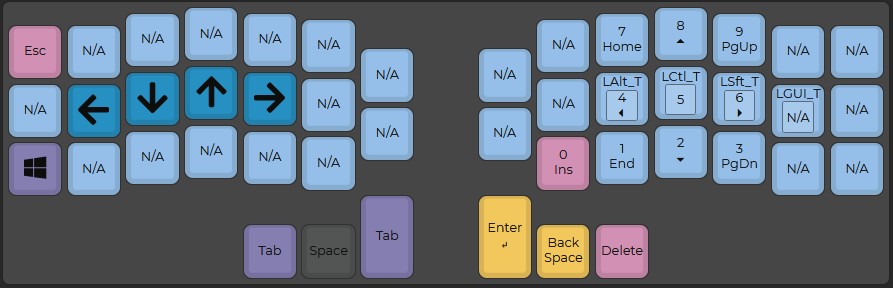 Layer two
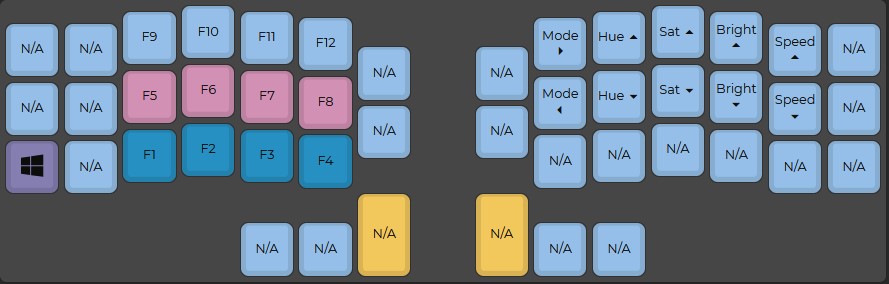 Layer three
The core idea here is based on layer tapping and home row mods using chordal hold. All my most common key combinations are performed by holding a dual-function key on one half then tapping my expected symbol on the opposite half. This isn’t entirely true as my symbol layer stretches across both halves so I have opted to place my most used symbols on the opposite half as a compromise instead of adding an additional layer.
Relying on chordal hold did mean that I had to instantly abandon the simplicity of using Vial for configuration as the feature had not yet been implemented at the time (it has since been added in Vial 0.7.4). Instead I use QMK and that would be my recommendation for anyone picking up a keyboard like this. Using QMK directly forces you to learn how to program your board exactly how you want it and as an added bonus you get to program some C.
If you are curious about chordal hold I recommend you also look at flow tap and quick tap. Home row mods has a pretty steep learning curve with a high degree of frustrating errors when typing. Adding these two configurations does make a world of difference. Below is my current tapping configuration where the numbers are in millisecond.
1
2
3
4
#define TAPPING_TERM 125
#define QUICK_TAP_TERM 125
#define FLOW_TAP_TERM 150
#define CHORDAL_HOLD
A note on Vim motions
If you are a Vim motions user I highly recommend having an easily accessible navigation layer in your setup. Since Colemak moves h,j,k and l following the normal navigation patterns becomes really hard if you are used to QWERTY. I didn’t have much trouble transitioning the other motions to the new layout after some practice.
Learning
You thought finding a suitable board with the perfect keymap was hard? It is nothing compared to actually typing on this thing. I am no way a fast typist but I am used to touch type on QWERTY. Dropping from 120 to 20 WPM is rough. I got frustrated enough at one point to just put down the board for a few weeks before trying again. So here are my tips for learning how to type on a split keyboard with a new keymap to boot.
Make sure you actually have the ergonomics right. Before my tenting setup arrived I was actually straining my wrists more with the new keyboard. This made practicing painful and I avoided it, thinking at first it was associated with the new shape instead of poor ergonomics due to my setup.
Don’t try to daily drive it from the start. The frustration of mistyping with home row mods is a killer the tenth time you alt tab in the same sentence. I set aside 30 minutes per day for training in a tool like keybr. This allowed me to work through the alphabet first then transition to sentences with capitalization and punctuation.
Because I am a programmer I followed up with a programming specific typing practice at typing.io. This allowed me to practice both Python and C++ without the pressure of feeling that I am not producing actual code at work or in my hobby projects. I tried using the board early for my hobby projects but quickly got frustrated as I wasn’t able to make the progress on my coding because of being blocked by my typing ability.
Keep your new board and old board close at hand. During my transition period to the new keyboard I was constantly switching back and forth depending on the task at hand. Catching up on Teams messages? New board. Crunching a critical bug in production? Old board. This kept on going for a month or so, sliding more and more usage to the new board as my typing improved. Notably I still run QWERTY on the old board and have done for the entire time to use it for gaming. Switching back and forth works perfectly fine despite the difference in layout.
Congratulations, you are now daily driving your new board. There is really no replacement for using it as much as possible but I strongly encourage not going here too soon because it gets very frustrating when you are unable to input a simple password and you can’t look up your keymap, trust me.
Outcome
Was it worth it? Complex configuration, expensive buy-in and difficult to learn, even harder to master? For me the answer is a resounding yes! Although I had my doubts along the way, my posture has actually improved greatly already after just a couple of months. I feel way less strain in my hands and wrists when typing especially when programming.
The board itself is fine, with a caveat. The v4.1 board has a design flaw where the USB connection will sometimes die due to electromagnetic interference. This mostly happens when I accidentally put my phone close to the keyboard and the consequence is having to unplug and plug in the keyboard again. Hardly a serious problem for me but considering the buy-in it’s important to be aware. You can read more on in this Github issue.
The other big thing to consider here is the number of keys. I was worried when getting the board that it would be annoying with having to layer swap for symbols, numbers and special function keys. This made me opt for the 46 key version instead of the more prevalent 36 key version. As you might have seen in my keymap I ended up not needing the extra keys. The minimal hand movement feels great, something I don’t think I would get with something like a Sofle or Lily58.
Overall I am very happy with the switch to a split keyboard. I have plenty of years programming ahead of me and lowering the risk of destroying my hands and wrists in the process feels great. I will most likely look for a replacement board for the Corne eventually because of the issues above. I also want to go back to Cherry switches and try a more aggressive column stagger. Currently eyeing a Swoop keyboard to size down to 3x6 for a smaller desk footprint.
I hope this gives some inspiration and guidance for checking out a split keyboard of your own, let me know your thoughts in the comments!